Wednesday, December 16, 2009

Gifts to give away

So my sisters, mom and I (5 of us total!) came up with a great idea for giveaway gifts this year.

We all spent a little time baking and made about 6 dozen cookies to share. Then we put together plates with about 2-3 of each type of cookie. Yummy!! Next year, I'm going to have to make a plate for myself!
I paired the plate with a vinyl nativity that I got here. I put the nativity on a tile and backed it with some felt and a ribbon for hanging.

I love it! Yummy treats, decorations, and all of it for just about $2 each!

I'm linking up to the Inpsired Room's Friday Linky Party!

Tuesday, December 15, 2009

My tree, in all honesty

I have so enjoyed looking at the beautiful trees on Thrify Decor Chick'sChristmas tree party! I didn't want to post my tree because it is not that fancy. But even though my tree is not fancy or perfectly coordinated, I still love it. So here it is, in all it's glory.

The top half- breakable ornaments.
The bottom half - kid friendly ornaments for my little one to move all around. Let's be honest - with a 19 month old on the loose, no decorated tree is going to stay that way long....

The burned out strands on our prelit tree separates the two halves nicely.

Kid friendly ornaments
When we travel, we get an ornament to put on our tree. Good way to collect souvenirs without having your house full of nick-nacks! This is one from our honeymoon - an angel from a cotton plant. The little snowman was a gift from one of my students my first year teaching.
Yup, not the prettiest tree ever, but my little one likes it and I like it. Well, all except for the burned out light strands. That will have to be on next year's to do list.

Friday, December 11, 2009

A small change with a big impact

So I have been really working on my mantle this year. I liked it ok, but still felt like it needed something. I love the little jars with ornaments and snow (epsom salt). But I felt like they kind of got lost on the big white mantle. I stared at them and talked to every.single.person who came over about how I needed to make a change. Then I saw the little boxes that came with the boxes I used for my ornament trees. Using the box and the lid, I was able to add some height and color without changing the jars at all. I LOVE it!

Before:
After:


Now, if I can just get the garland up before Christmas!

Monday, December 7, 2009

If you can't be crafty, know someone who is!

One thing I love about putting up my Christmas decorations is all the memories they hold. When I was in college, my mom used to make decorations and send them to me, so my drab college apartment would have a little holiday cheer. When I pull them out now, I rememeber hanging them up in all my apartments (a different one each year of school!), in our newlywed apartment and now our first home.

Did I mention my mother is an AWESOME quilter/seamstress?

Here's a few things she has made for me. Oh, and she makes matching things for each of my 4 siblings too. Yea, she's awesome!
Advent Calendar
The pieces still to go up

I love this one!

The advent calendar (after I ate all the candy off it!) :)

I love my mom!

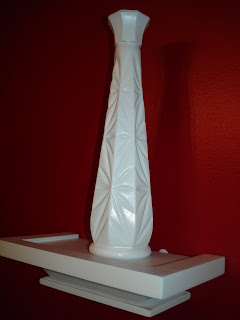
My first spray painting project

I sort of copied my sister in creating a white collection to decorate my dining room wall.

Goodwill cups and vases - about $6 total.
2 cans of spray paint.
shelves from Lowe's clearance.
a silk Orchid (my favorite flower)

I LOVE it!


Sunday, December 6, 2009

November

Though I can't claim making all (or even most) of my holiday decorations, I was so pleased with how they turned out, I couldn't resist blogging about it.

Thanksgiving
Love the little pumpkins from Dollar Tree. Seriously, I go there too often.
Found the cute scarecrow at a craft fair a few years back.


Cute pumpkins made by my sister - fabric circles, beans, and a pumpkin stem. She says they are pretty easy.
And yes, these stay up until Thanksgiving day. No mixing holiday decorations in this house!

Friday, December 4, 2009

Christmas trees

I was totally inspired by this ornament tree.
I really needed something for my mantle, and thought the little trees would be perfect. It took a few tries, several trips to the dollar store and a whole lot of hot glue, but I think they turned out pretty well.

Here's what you need.
Ornaments - from the dollar store! :)
Ribbon
Styrofoam cone (I spray painted mine red to match the ornaments)
Small balls - my sister had some left over from her garland and gave them to me. They come as a bunch and each is attached to a wire.
Hot glue gun
First, remove the caps from the ornaments. I started by gluing the balls on. I stuck them in the foam first to make a dent in the foam. Then I filled the dent with hot glue and pressed the ornament in. I did mine very randomly, but I think it would work better if you started at the bottom and went up.

Then, I used some ribbon to fill in the cracks. I secured the end of the ribbon with a pin, then just kind of weaved the ribbon around until I was happy.
Then I pulled the silver ball bush apart and stuck the small balls in any space big enough to hold them. I didn't have a pretty base like the original. That's where the multiple dollar store trips came in. I finally found the perfect thing - a small round gift box. It came as a two pack. I decided the bigger one made a better base. Hot glue that to the bottom of the tree and Voila!
Check out the full effect.
Now I just have to figure out how to hang up my garland. Any tips? I've never done it before!
Close up -
I must point out the cute ornaments in snow/epsom salt. Thanks to the idea from The Inspired Room

I'm linking up to The Inspired Room's holiday linky party and The DIY Showoff Holiday Highlights!

Tuesday, October 27, 2009

2 steps forward, 3 steps back

So I thought I was insanely close to finishing the bench - just one more coat and touch up a few spots. That's when the hubby pointed out that I hadn't fine sanded it and I would need to do that if I wanted it to look nice. I tried to pretend like he was wrong. But after looking closely, I realized that it was already getting dusty and the dust sicks in the rough part of the wood.

Now I'm fine sanding it. The good news is that it isn't taking off as much paint as I thought, so I think I'll be able to finish it this week for reals - that is if it will stop raining!! It's just frustrating to think you are almost done and have to redo it!

The good news is that we've made tons of progress on the kitchen. All that is left is to paint the ceiling. I was hoping to finish Saturday, but with all that we had going on (church Halloween party, football game to watch!), it didn't happen. Tonight, we'll be painting while we watch Biggest Loser. Hang up accessories on Wednesday and then it will be time for the big reveal - YEA!

Tuesday, October 20, 2009

2 coats down, 400 more to go

It's time to share our "after" pictures for The Inspired Room's Procrastinator party!
I took on two projects. (See my "before" post here)

My $7 garage sale find toy bench and painting the kitchen (it has only taken a year since we had a water leak in the ceiling!).

First the bench.

This project was much harder than I thought it would be! Stripping off the yucky paint, then sanding, then using the orbital sander, then sanding some more. Did I mentioned that it has rained in Atlanta for like 2 months straight? (Don't worry, the bench only got rained on 3 times!) But I am pleased to report that I got *most* of the yucky paint off and managed to start painting. I started off with one can of spray paint. Really? I am not sure what I was thinking!! This is the biggest spray painting project I have ever taken on. My trigger finger is starting to hurt!! I managed to get enough paint on to show the color it will be soon. But yea, I have about 400 more coats to do. Luckily it has finally stopped raining, so I am hoping to be done with it this week. Also, I learned that when spray painting red it is best to wear gloves. Otherwise you come out looking like you just killed somebody. :)
Before:During (after stripping the paint):

And currently.Don't worry, I bought more spray paint! I am considering painting some chalkboard paint on the underside of the seat, so when you flip it open, it shows the chalkboard. Or perhaps some black polka dots (little bit's room is decorated with lady bugs) Any thoughts?

The kitchen-
Well, I can't blame it on the rain. I didn't finish this one either. Priming took longer than I thought. But it is all primed and there is paint on the walls!! And I LOVE the color. I want to paint all the ugly flat builder's cream in my other rooms with this new great color!!

Before:

During (the part that is painted). You can see the new color (brown), then the primer (white), ugly flat builder crap (cream). What a difference!! And when it is done, I am going to hang these awesome plates that I got from Goodwill for $.25 each on the same wall in the "before" picture (I took down the elephant plates). They go perfectly with my candy-apple colored dining room!

Though I didn't declare this one, we did finally get shelves up in the attic!! Yea!! Now all my classroom things have a home that we don't have to trip over every time we go in the office!Though we didn't finish, it is great to have made progress, and I am certain that we'll be done by this weekend. Check back! :)

Sunday, October 18, 2009

The hard part is done!

I learned how to use the orbital sander and got most of the yucky white paint off of the bench! Now a little hand sanding for the rest and we are ready to paint. I also discovered why the previous owner painted it. There was crayon all over the beautiful maple wood!

Please excuse my messy garage... :)
The seat. If you look closely, you can see the faint traces of pink crayon all over.

Now the question - do I paint it blue or green? I have about 1 1/2 gallons of each. Ellie's room is a very light green, and the green I have is darker. I am thinking that at some point, I would like to paint the bottom of the seat with chalkboard paint, so when she opens it, the chalkboard will be facing her. Any suggestions?

Saturday, October 17, 2009

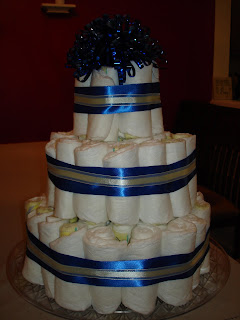
Diaper Cake


Thanks to Google and You Tube, I made a diaper cake for my cute SIL's shower last night. I thought it turned out pretty well. I used 1 1/2 "jumbo" packages of Pampers size 1 diapers (about 60 diapers). I put the extra diapers in a gift bag to give to her. I thought it turned out pretty well!

Homemade Halloween

I made a few things to add to my Halloween decor this year. I have several other crafts started... I'm starting to think they'll be for next year. :)
$1 frame from Michael's, spray painted black. Glue a few chipboard stickers (from the Target dollar spot) and add some paper and another sticker (also from Target) as the "picture.

My husband has this little crockpot that I thought looked like a cauldron. So I added some green foil shreds, eyeball candy, skeleton hands (all from the dollar store!). I think next year I'll add a little sign to the pot. Here's a view from the top.

My favorite, though the picture didn't turn out. Some little orange pails from Target dollar spot (2 for $1) that I used a sharpie to draw faces on. Add some foil shreds that I had left over.
Simple, easy and cheap. I like it!