Showing posts with label for the little one. Show all posts

Wednesday, January 11, 2012

What I keep in our church bag

Here's a few things I keep in our bag to keep my little one quietly occupied during church.
-Our collection of fabric "paper" dolls.

-A quiet book.  I looked in to sewing one of these, but the time was just not worth it to me.  Plus, once you make it, you can't really change the pages.  I instead opted for a 3 ring binder, some page protectors, and pages from our church's children's magazine.  There are stories...

 ....and pages to color with crayon.  Some of the mazes and things, I let her use dry erase crayons or markers and then we can use that page over and over again.  Plus, when she gets tired of the pages, I just swap them out for others.  Since the children's magazine comes every month, when we get a new one, I rip out any pages I think would be good for the quiet book and keep them in a folder.  Not as cute as a true quiet book, but a whole lot faster.
 I turned the scripture hero picture at the end in to a puzzle. (mounted on cardstock and laminated, of course!)
 -of course there are coloring books or notepads and crayons (which I keep in a crayon roll like this one - http://thepleatedpoppy.com/2010/05/crayon-roll-tutorial/ ) I don't have picture of mine, but that's the tutorial I used. I also made one for color wonder markers.
-Some file folder games that are church related
 -Matching games - like this Popsicle one for colors.  I also have a few memory games with about 8 matches in each game.
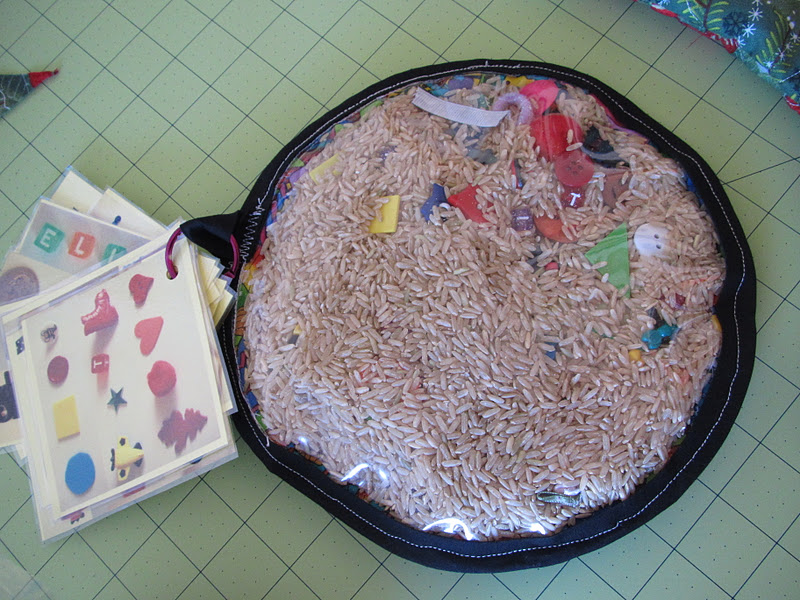
- I spy bag
- and finally some of these magnet tins - http://www.amazon.com/Noahs-Ark-Magnetic-Fun-Tin/dp/B004LC31YU
I try to swap things out to keep it fresh.  Everything has a pretty low profile, so I don't feel like I am toting a ginormous toy bag to church every week! 

Sunday, January 1, 2012

Quilt top done!

I finally finished my daughter's quilt top!! I really think it's coming together nicely!


(Just please don't look to closely because you will see my 50,000 mistakes!

Thursday, December 29, 2011

A few Christmas projects

Now that Christmas is over, I can share some of the homemade things I did this year!
I have some cute, handmade stockings that I've been using since we got married.  Problem was that I only have 3 and this year I needed 4!  So, following the scrappy log cabin style, I made another stocking (along with some help from my mom!).  That would be easier and cheaper than buying 4 new ones, right?  The only problem is that seeing the beautiful quilt shop fabric I used on this one made me want to replace the others!! I loved the old ones until I saw the new.  And I cut this one a little small and sewed it more like a boot than like a stocking. So I guess next year I'll be making 4 new ones.  So much for easier and cheaper!
 fabric close up
with his buddies!
 My mom helped made this for me while I worked on my stocking.  My cute girl needed a new pillow for Christmas.  But what fun is a pillow without a sparkly pillowcase to cover it?  For the record, I know how to make these, but my mom has a serger and it is so much faster on that!
 I made 2 of these I spy bags.  One for a friend's birthday and one for my kids.  This is the first time I actually made one.  A few lessons I learned:
1. The hardest part is finding things to put in it.
2. Buttons are a good solution for #1
3. Don't line the back.  I sandwiched interfacing between 2 layers of fabric so the wrong side wouldn't show through the clear window.  Better to use flannel and have it be pliable - and it's ok if the wrong side shows!
4. Use hard laminating for the tag.
5. Make these square.  Seriously, what was I thinking with the circle?  Let's pick the hardest shape to sew.
6. Shower curtain liner will not work as the plastic.  Just buy some from JoAnn's.  (Or borrow some from  your sister who is also making I spy bags, like I did).
 Ours had fish on it.  For our little friend, I did a sports fabric that I've loved for a while but has needed the right project!
 Here's the contents list....
 but 3 year olds can't read, so I took pictures!
 I made table runners for some ladies at church I work with.  I was at the quilt shop buying fabric for my stocking and they had so many cute Christmas fabric, that I decided to make these so I had an excuse to buy some of the fabric!
 Love it!
 Some hooded towels for my cute baby! (In BYU colors, of course!!)
 A dolly blanket for my daughter's baby doll.  I used scraps from her brother's quilt.  Looking back, I wish I had added one more row on each side so it was a little bigger.  It works ok, but not quite big enough to sufficiently wrap the baby doll.  Or so I have been told.
 Backed with minky.  I wish I had a blanket backed with minky.  That stuff is so soft!!
 And finally I actually made some projects that I found online.  Its a miracle!! Big sister helped me make this one for little brother.  (I think the original is a little cuter, but I like mine too!)
 And a couple pom pom scarves for a cute niece! I hope she likes them!! I used variegated yarn for these, thinking that would give good color contrast.  I like how they turned out, but I think next time I would use 2 different colors of yarn.  They turned out different than I pictured, still cute, but different!

Friday, April 22, 2011

Why I don't make toys

 I worked really hard at making my daughter some cute paper dolls.  I found the fabric at the quilt shop, cut out all the dolls and their clothes, backed them and even made a cute carrying pouch for all the clothes and dolls.  I knew it would be so much fun for my daughter to play with and keep her quiet during church. 

But everytime I get them out, my daughter looks at me and says, "no, let's just clean them up."  Fine, I'll just play with them by myself because I think they are cute and fun!!

Friday, January 14, 2011

What I've been up to....

I recently turned this
and this....
 into cute "paper" dolls with clothes.  And had some leftovers to use for gifts for other little girls that may like them!
 

I made a table runner for my MIL and one for myself for Christmas.  

My quilt class is finished now, so I have turned my eyes to making Ellie a big girl blanket for her big girl bed.  Imagine this....
with this fabric...

Here's hoping I can pull it off!!

Thursday, July 8, 2010

Latest projects

Lately I've been giving my sewing machine a good workout with:
  • blocks for my block of the month class at a local quilt shop. I love going to this class! I love spending the morning with my mom and looking at all the fabric.  And I love pretending I understand all the terms everybody uses!


  • Working on ornaments for my tree this year.  I've made good progress in getting the background stars cut, most of the pieces traced and cut out of the fusible web.  Still need to fuse to fabric, cut them out again, then piece together on the star.  Think I can finish by November?
  • An awesome project for a friend who just had a baby which I can't share yet, because I haven't sent it yet and she may read this!
  • Happy thoughts about the project I bought the last time I went to the quilt shop....guess what I'm making!

Tuesday, March 2, 2010

Bow holder

Before Christmas, I tried to make a bow holder for my 8 year old niece.  I took old picture frames, spray painted them, with plans to cover the inside with fabric, add ribbon, etc.  After 4 frames and 2 cans of spray paint, I wasn't any closer to being finished, so I admitted defeat and bought her some earrings. 

But recently I noticed that my box that holds bows for Little Bit was getting a little crazy.  I really needed a bow holder.  Knowing my past failure tries, I decided to go for something a bit simplier.  Her room is done in ladybugs, so I took some little wood cut out ladybugs (Michael's, about $.50 each) and glued some ribbon on the back. 

Then I used the sticky thing you use to hang up 3M hooks (don't you love my acurate descriptions of things!) to secure them to the closet door.  It took about 15 minutes and I LOVE it!

Tuesday, October 27, 2009

2 steps forward, 3 steps back

So I thought I was insanely close to finishing the bench - just one more coat and touch up a few spots. That's when the hubby pointed out that I hadn't fine sanded it and I would need to do that if I wanted it to look nice. I tried to pretend like he was wrong. But after looking closely, I realized that it was already getting dusty and the dust sicks in the rough part of the wood.

Now I'm fine sanding it. The good news is that it isn't taking off as much paint as I thought, so I think I'll be able to finish it this week for reals - that is if it will stop raining!! It's just frustrating to think you are almost done and have to redo it!

The good news is that we've made tons of progress on the kitchen. All that is left is to paint the ceiling. I was hoping to finish Saturday, but with all that we had going on (church Halloween party, football game to watch!), it didn't happen. Tonight, we'll be painting while we watch Biggest Loser. Hang up accessories on Wednesday and then it will be time for the big reveal - YEA!

Tuesday, October 20, 2009

2 coats down, 400 more to go

It's time to share our "after" pictures for The Inspired Room's Procrastinator party!
I took on two projects. (See my "before" post here)

My $7 garage sale find toy bench and painting the kitchen (it has only taken a year since we had a water leak in the ceiling!).

First the bench.

This project was much harder than I thought it would be! Stripping off the yucky paint, then sanding, then using the orbital sander, then sanding some more. Did I mentioned that it has rained in Atlanta for like 2 months straight? (Don't worry, the bench only got rained on 3 times!) But I am pleased to report that I got *most* of the yucky paint off and managed to start painting. I started off with one can of spray paint. Really? I am not sure what I was thinking!! This is the biggest spray painting project I have ever taken on. My trigger finger is starting to hurt!! I managed to get enough paint on to show the color it will be soon. But yea, I have about 400 more coats to do. Luckily it has finally stopped raining, so I am hoping to be done with it this week. Also, I learned that when spray painting red it is best to wear gloves. Otherwise you come out looking like you just killed somebody. :)
Before:During (after stripping the paint):

And currently.Don't worry, I bought more spray paint! I am considering painting some chalkboard paint on the underside of the seat, so when you flip it open, it shows the chalkboard. Or perhaps some black polka dots (little bit's room is decorated with lady bugs) Any thoughts?

The kitchen-
Well, I can't blame it on the rain. I didn't finish this one either. Priming took longer than I thought. But it is all primed and there is paint on the walls!! And I LOVE the color. I want to paint all the ugly flat builder's cream in my other rooms with this new great color!!

Before:

During (the part that is painted). You can see the new color (brown), then the primer (white), ugly flat builder crap (cream). What a difference!! And when it is done, I am going to hang these awesome plates that I got from Goodwill for $.25 each on the same wall in the "before" picture (I took down the elephant plates). They go perfectly with my candy-apple colored dining room!

Though I didn't declare this one, we did finally get shelves up in the attic!! Yea!! Now all my classroom things have a home that we don't have to trip over every time we go in the office!Though we didn't finish, it is great to have made progress, and I am certain that we'll be done by this weekend. Check back! :)